
How To Install Permeable Paving
Permeable paving cells allow stormwater to drain effectively on grass, soil and gravel surfaces, reducing runoff and flooding. They are a sustainable solution for patios and walkways, as well as driveways and car parks thanks to their high load-bearing capacity. This guide will cover the basics of installing permeable paving cells.
Step 1: Prepare the Base Area
The base underneath the paving cells needs to be porous as well, allowing water to drain through. So to begin, you should excavate 4-6 inches of soil or sediment and backfill it with crushed stone. You should then compact the stone to ensure the base is as flat as possible. Whilst this can be done with a wacker plate, less expensive tools can be used instead such as a hand tamper or roller tamper. Once finished, the base should have a 1-2% grade to allow for drainage.
Step 2: Fit the Edge Restraints
Edge restraints are used to prevent the paving cells from shifting around during and after the installation. You can use concrete, plastic, wood or metal edging dug into the ground around the perimeter. Depending on where you are installing the permeable paving, edging may already be in place such as timber garden edging or walkway borders. Ensure that you leave a 1/2 inch gap between edging and paving cells in order to allow for expansion.
Step 3: Lay the Geotextile Membrane
Geotextile membrane acts as a separation layer between the base and paving cells and will allow stormwater to drain into the soil at a controlled rate. Unroll the membrane over the base so that it covers the entire area, and try to overlap sections by 6 to 12 inches. The membrane will also prevent fine pieces of sediment from getting through to the base.
Step 4: Install the Paving Cells
Arrange the paving cells on top of the membrane in the desired pattern and connect them together using the clips alongside the edges. It is helpful to use string lines during this part of the process in order to keep rows of cells straight.
Step 5: Fill the Paving Cell Cavities
Once you are happy with the way your paving cells are fitting, you can begin to shovel gravel or soil into the paving cell's cavities. Aim for 1/8 to 1/4 inch below the cell surface. The gravel or soil helps hold the pavers in place whilst also allowing for efficient drainage. Once you have filled all of the permeable paving cells, you should then compact the gravel or soil with a hand tamper.
Step 6: Fill Gaps and Sweep
To finish off the installation, spread additional gravel or soil over the surface and into any remaining gaps between cells and compact again. Finally, sweep away excess gravel to ensure the area is tidy. Your permeable paving system is now complete! The only maintenance required over time is sweeping occasionally to clear debris.
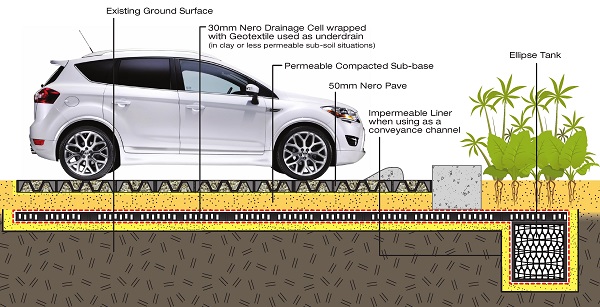
As can be seen in the image at the top of this page, permeable paving is often paired with drainage cells and soakaway crates in order to create a full sustainable drainage system. For more information on how to install those, please check out the articles linked below:
If you have any questions about permeable paving that are not answered here, please don't hesitate to get in contact with us.


